About Me

My name is Myia and I am a mom to two wonderful girls. We love to explore life through sensory/messy play and nature. I strongly believe that you need to let children "be little" to reach their full potential. We encourage mess and exploring to build our little one up. We learn through a mixture of Reggio/Waldrof/Montessori practices. Follow for ideas and experiences in sensory play as well as our attachment parent journey!

Sunday, October 25, 2015

Magnetic Blocks reviews: Magna-tiles, Magformers, Smart Max and Tegu Blocks

For Tegan's second birthday, I finally decided to invest in magnetic blocks, and I honestly wish I would have sooner! I chose to buy three small sets of three brands, Magna Tiles, Magformers, Smart Max,and Tegu Blocks. I wasn't sure which ones would suit us as all three sets really do different things. I'll be doing a in depth review of each on separate posts as the review might get lengthy. First up, Magna-Tiles! 

Magna-Tiles-$75 for 48 piece DX set (includes some "special" pieces like a door and car)

So Magna-Tiles hold the title of the king of all magnetic building blocks, and it is true. Magna-Tiles are thick, sturdy, and the magnets are powerful. The price reflects this; however I would consider these a "heirloom" quality toy-as heirloom as plastic can get! These will easily last multiple kids, and because they can serve such a large age range it is SUCH a good investment. We had a one year old friend play with these intently, as well as us adults!

I took these photos JUST this morning as she was playing with them!


What does Magna-Tiles work best for? Building structures! And large, fun ones at that. You can't find a better set to build structures, because of the powerful magnets it is easy for a young toddler to build houses. You can let your imagination roam and build castles, forts, you name it. That is what makes these tiles so great for many ages is the ability to make simple or complex designs. As you will see in my next reviews of the Tegu Blocks and Magformers, these are the best and maybe only blocks to build such structures. They are not good for building things such as 3D images, such as animals, flowers, ect.

Even if you don't have a light table, they look beautiful in sunlight!

However, some people will ask if they should just invest in Magna Tiles before wood blocks and the answer is NO! There is one plus/minus and that it is easy to build with. If you start your child off with these, they might get frustrated with traditional blocks. Traditional wooden blocks provide much needed motor skills, as well as patience, and above all, deep problems solving, "Why did my tower fall over?" While magnetic blocks can also foster this, they don't replace wooden ones. Also, they don't replace Mega Blocks (large "baby" legos) or Legos themselves. It is important to understand that really they all foster specific and different skills!

 You will need a large set. These 48 pieces were not enough, I also suggest getting a classic set rather then the DX set for your starter. An "Ideal" collection would probably have 200 pieces, but you can easily start off slow and build your collection. We are planning on buying her another larger set for Christmas. The tiles ARE large though. Bigger than you might think!

Easy to build

Don't forget they have a "Ice" and "Black" set that although not as cost efficient as buying a large set, are a fun addition to the collection. Frozen lovers will love to build castles with the Ice set!

They also have a "Solid Color" set that tends to run $10 cheaper than the transparent set. We chose the transparent set because we plan on using them on the light table, but if that isn't a worry for you go ahead and save the $10!


I have had some people ask me about Picasso Tiles, and for $40 cheaper they will catch your eye. However, they are not worth long term investment. If you are on a really tight budget, only have one or two children, these will work. But if you are like me and have young kids with more in the future and want a set that truly last through the years, it will be better to invest in Magna-Tiles. I also had a few crack on me. The magnets are not as strong as Magna-Tiles and larger structures are harder to build, as well as younger kids will get frustrated they don't "connect" as easily.

I was also recently told about Play Mags with a positive review. Not as strong or as thick as Magna-Tiles, but much better than Picasso Tiles. If I get my hands on a set, I'll update the review, or if you have a set let me know what you think!

I think any STEM focused family, or a family that simply enjoys building, Magna-Tiles are a MUST in your toy bin. If you had to chose ONE magnetic block to buy, I would also suggest Magna-Tiles due to the versatility in age range, quality, and building ability.

Let me know what you think of Magna-Tiles!


Friday, October 9, 2015

Egg Splat Painting


First off, let me tell you the hardest thing about this activity was carefully cracking the eggs! Talk about a pain in the butt and my scrambled eggs had shells in them for days...


But it was fun! I simply cracked the tops of eggs, used the yolk, and washed out. Once I had a dozen I filled them with paint. I used recycled shipping paper as our work place. 

Tegan was pretty confused about it at first, she wanted to "Dump" the paint out. And when she did throw them, she wasn't quite strong enough to break them


But nevertheless, she had fun.


She realized there was more paint inside them after she poured them out, so she tore them apart which was actually pretty fun for her to do because it made it all slippery. 

After she had cracked them all, I let her put water in the paint bottles that had only residue left in and she "painted" with those.


Overall, this is better suited for children strong enough to throw the eggs hard. Or, climb a small ladder or slide and "Drop" the eggs, which is what I think we should have done! For the work of trying to delicately crack the eggs, I wouldn't do this again haha!

Thanks for reading!

Wednesday, September 30, 2015

Shaving Cream Art


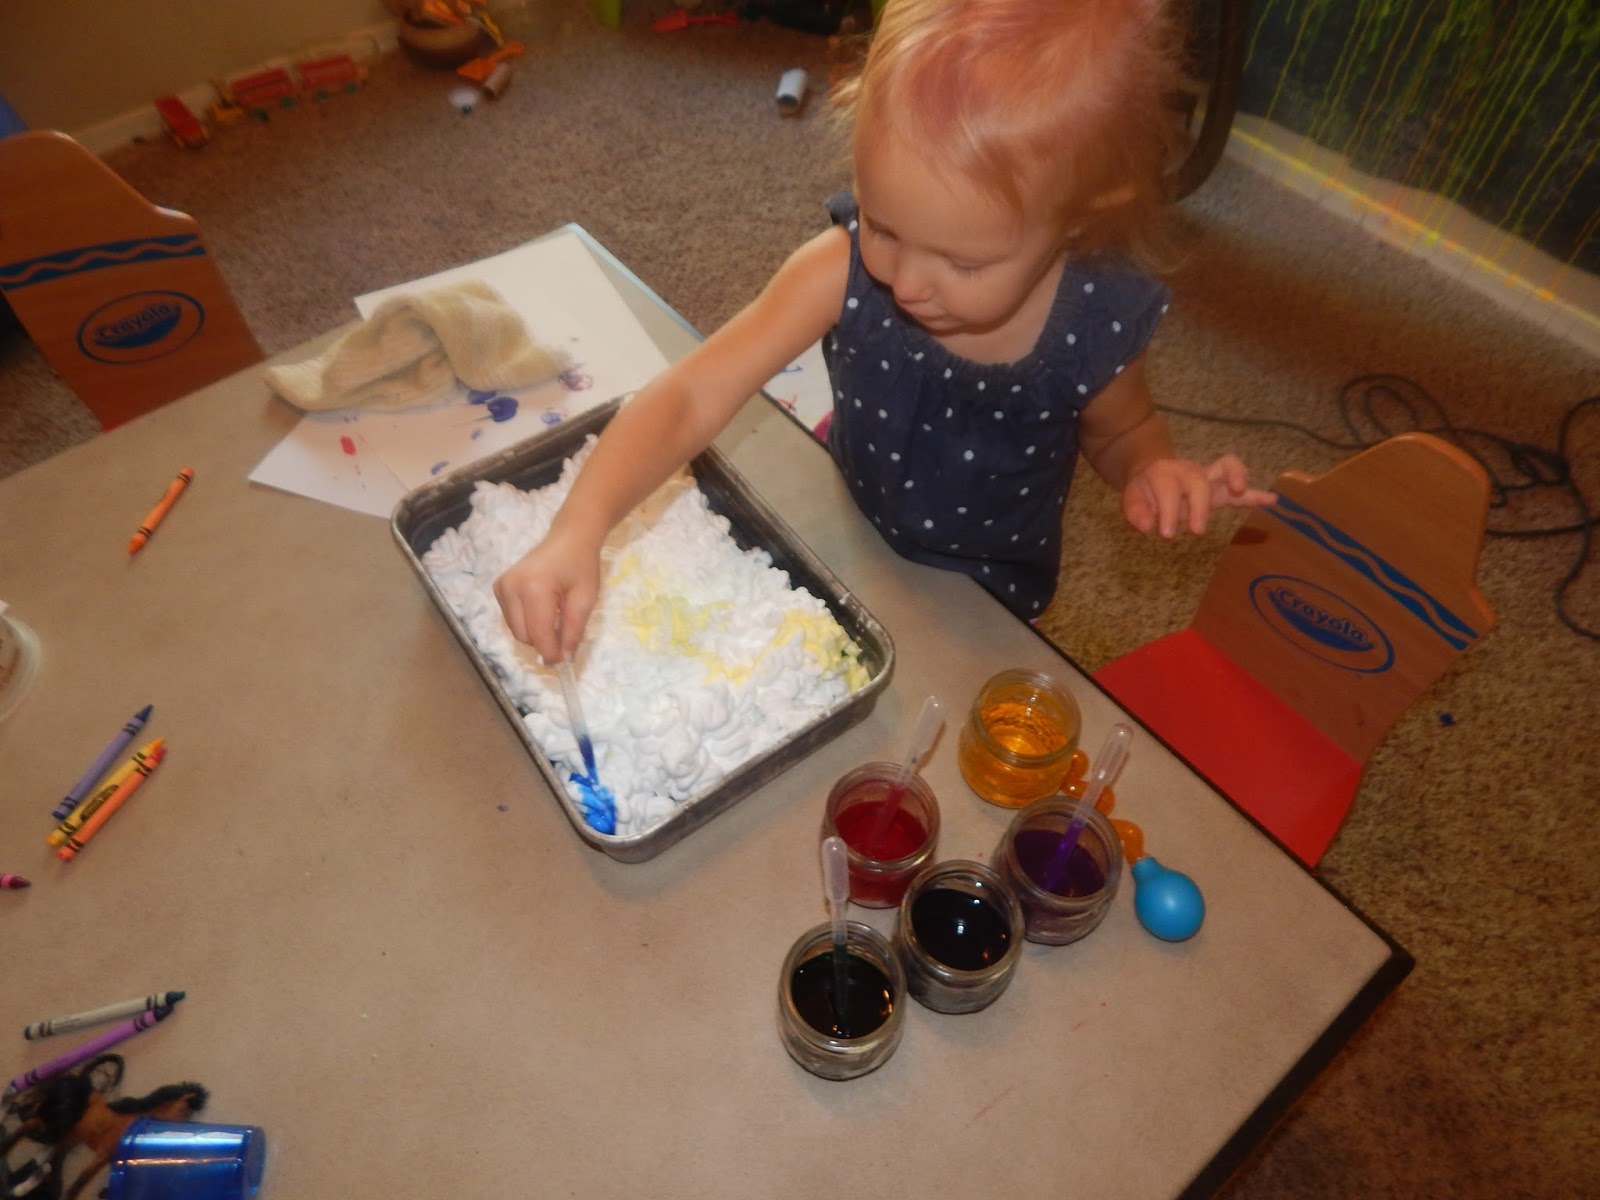
 This is a simple, easy, and  easy to clean up activity. From 18 months and on, developmentally motor skills are soaring. Tegan has been perfecting her use of pipets over this time period. Water color activities help strengthen her dexterity and focus!

This is a two part activity: first we set up primary water color (using liquid water colors diluted in water) to "paint" a scene into the shaving cream set in a container.


Droppers are perfect for this "painting," as you can see Tegan has a Learning Resources dropper (The bigger one, which is easier to hold and squeeze), and more adult droppers that require more skill. The Learning Resources droppers are great for beginners and as they improve their skills you can move on. If you child is having difficulty using the droppers, I suggest putting a tiny amount of colors into small containers and letting them "dump" the colors onto the cream.


This was also our first time using liquid watercolor concentrate instead of food coloring or washable markers for "diy" watercolor. I am impressed! The colors were much more vibrant, and no staining of the hands!


Now after they finish, you simply take a thicker piece of paper and put it on top of the cream. You have to squish it down and move a bit. I then "scrape" the cream off using the side of the pan.

Here are our prints!


Afterwards, I put water beads into the shaving cream because it is one of the most interesting tactile activities! So really, we go three types of play out of this activity, using a $1 can of shaving cream!


Friday, September 25, 2015

Sudsy Goop

Here in Arizona, it can simply be too hot to play outside. Even at 7am, it can already be in the 90's. However, I try to encourage Tegan to get out even if it is a little bit and she happily obligates, especially if water fun is involved.

Sudsy Goop is a fun activity using only four ingredients, cornstarch, kool aid, soap, and water. I used a bottle of dollar store baby shampoo for this particular time. Kool aid is for color and smell.

When you add water slowly to cornstarch, it creates a slime that can be solid in your fist and then "melts." Adding soap makes the goop a little more runny, and when you swish it dissolves and creates long lasting bubbles.


The best part is I love it when Tegan "Decorates" our patio. Kool aid and Cornstarch is a easy way to make chalk! So when she poured/flung the goop, it will actually dry like chalk.


I have left it out all day, and she has come back to it several times


This is from this afternoon:


It was easy, cheap, and a really fun activity that cleaned up well. And I am loving the dried art created from it! 


Thursday, September 24, 2015

Exploring Oil and Paint

We did this activity a few days ago, but I promised myself I would start updating my blog again! So I want to review one of our favorite activities from this week.

I like to allow art everyday; I keep supplies always open and available to Tegan. Let art happen naturally through drawing and paint. Sometimes since she is so young (2) she does need invitations to create and encouragement from myself as well.

I decided to take a little guidance with our art this day by exploring density. While she was too young to understand ( I think, you never know!) I explained that the oil in the bag was reacting to the tempura paint differently because the liquids were different in density.

We simply used one bottle of canola oil (use different oils, such as coconut, baby oil, ect for more experimenting!)

Tempura paints

2 ziplock bags-You might want to add tape to the top if you have a especially strong toddler.


We first poked, prodded, and squished the bags. Then Tegan took to vigorously shaking them! What was interesting is the lighter color bag mixed differently than the darker colors. For older children it would be a interesting lesson to research on why!


I ended up not being able to take photos, but we then poured the oil and paint into containers and panting with them. The oil saturated our plain paper pretty badly, next time I will use card stock so we can keep our creations!

We continued our "Oil" lesson with density by combining baby oil, glitter, and ice. The oil and glitter create and amazing glistening look while getting the ice "Slick." As the ice melts, the density of the water and oil repel each other, and the glitter stayed with the oil. Fascinating! We made ours into a "arctic" scene.


One of the biggest benefits of this lesson was to really use a different texture of oil. We have not done too many art or bin activities with oil. I am really interested in using oil and water beads in our next "oil" activity! Stayed tune for updates :)


Wednesday, April 22, 2015

Planting Flowers Play Dough

Happy Earth Day! As you know, we've been celebrating all month and we will be continuing to celebrate all month! Today we did two activities, but the craft I will be posting later (busy mom!)

We had a simple activity using Tegan's favorite medium, play dough. I got to dye the dough black which was fun for me for whatever reason-I am so used to natural or bright colors doing something dark was interesting!


Again I used my basic recipe, but with black food dye added:
  • 2 Cups of Flour
  • 2 Tbsp of Oil
  • 1/2 Cup of Salt
  • 2 Tbsp Cream of Tartar
  • 1 1/2 Cup Boiling Water
I had to use coconut oil this time as I was out of my dough oil I keep on hand-and I would have added less oil. When it cooled I had to had more flour because it was oily!


I let Tegan use her imagination on where she wanted to take this activity, which to my dismay wasn't the flowers. She only played with them for a short time, then continued to play with the dough as she normally would. 


Don't mind the strawberry yogurt all over her face LOL she would not let me clean her up! 


We read a few Earth day books, but I unfortunately didn't have any age appropriate garden ones! Hopefully next year I will. We did read a few flower books and tree books.


Happy Earth Day everyone! What did you guys do?


Tuesday, April 21, 2015

Sticky Earth

For our Earth Month theme, we did a simple activity we often do that is a lot of fun and also educational. We simply use contact paper (clear) and a type of medium to practice our fine motor skills sticking our medium to the contact paper.


I simply cut a circle shape (kinda, lol!) out of our contact paper (I got mine at Target-in the home aisles) and cut blue foil as well as blue and green foam shapes. 


Again, I just let her put the colors wherever, but it might be fun to see if you could do a replica Earth from your head! 

And our finished project:


The best part, the foam pieces are reusable so its something they can come back to throughout the day!